|
Rerigging a
Perry 35
I’ve just
finished rerigging my 1979 Perry 35 "Jacqueline Boo". I did most of
the work myself, and it took 2 months working evenings, weekends and occasional
holidays. I hope my experiences might be of some help to anyone planning a
similar job.
I bought the
boat in August’99 knowing that the standing rigging needed replacing, and
suspecting that the chainplates might also be dodgy. I therefore planned the
rerig to do all of it at one go.
The job
proceeded as follows:
Pulled the
mast using our (cheap) facilities at Hebe Haven Yacht Club (Hong Kong) and laid
it down on sawhorses. The stick is a one-piece 45 foot tapered aluminum
extrusion from Yachtspars New Zealand, with single spreaders. I took off the
spreaders (discovering that the spreader tips, which are welded in, had corroded
dangerously).
Removed old
standing rigging (8mm 1x19 stainless with swaged Hasselfors T-Terminals at the
top and Cheoy Lee mechanical terminals at the bottom). There was nothing
obviously wrong with any of this, but it looked original, and was well past
replacement date.
Stripped the
old flaking white paint off the mast and spreaders and took most of these down
to bare metal with 120 grit wet and dry. There was no significant corrosion, for
which I was extremely grateful (the initial survey of the boat had suggested the
mast was sound).
Removed old
lights, VHF etc, and also took off the winches, gooseneck fitting, vang
attachment and one corroded cleat. Pulled the old halyards and left messengers
in their place.
All the above
was pretty quick and easy.
I then
measured up the old rigging and ordered new wire and fittings from Jimmy Green
Marine in the UK (I’m a Brit!). The order was for 8mm 316 wire, swaged
T-Terminals at the top and loose 5/8" Stalok turnbuckles at the bottom. I
ordered each wire about 18" overlength. Top fittings for the fore and
backstays were swaged toggle forks for which I made overlength 5/8" clevis
pins using 316 stainless. Total cost from JG Marine including shipping was
approximately US$2,250.
Thought was
required for the fitting sizes. The originals were 9/16" which are not
easily available (thank you Cheoy Lee!). I decided to go up a size to 5/8"
for safety. This was possible because I knew I was also going to fit new
chainplates and could put whatever size holes I wanted into them. The masthead
fitting was drilled out from 9/16" to 5/8" (plenty of spare metal).
Primed the
mast and spreaders with acid etch primer and put on two coats of International
Marinecoat Undercoat (single-pot and very easy to use).
I then got
going on the chainplates. This was the hardest part of the job. Luckily, on the
Perry 35 the chainplates are easily accessible below deck, being bolted onto
substantial knees which are exposed in the lockers. The old chainplate bolts (4
per plate) came out with some assistance from a copper mallet. Most of them were
stained and some were obviously corroded, although whether this was significant
I could not tell. The chainplates then knocked out easily, except for the
backstay which involved splintering some teak deck.
I had
deliberately not sailed the boat after buying it because I did not trust the
rig. When I pulled the starboard outer chainplate (cap shroud) I was very glad
of this, because it was cracked half way through. It was also obvious that all
three starboard chainplates were misaligned, being canted outboard at about 15
degrees. This certainly explained the location of the crack in the cap shroud
chainplate.
The old
chainplates were 5/16" thick and I made a conscious decision to up this to
3/8", even though it involved making the holes in the deck bigger (which
took one full day using a variety of hand files and a lot of sweat). I had the
new chainplates cut as blanks in flat bar by a local yard using 304 stainless,
as I found it impossible to get 316 in these amounts and sizes. I was not too
concerned as I believe Cheoy Lee also used 304 for their fittings and the old
plates had lasted for 20 years, even though 3 of them were badly misaligned. I
have been following the discussions on the web on the relative merits of 304 and
316 for this type of work, and have concluded that no one can reach a
conclusion! I also made 5mm backing plates for the chainplates from 304 - the
originals had just had washers on the bolts. I bought new 3/8" bolts with
long unthreaded shanks so that the load was not carried on threaded sections.
I then drilled
all the holes in the chainplates using good quality HSS 3/8" drills for the
bolts and a 5/8" stainless-cutting hole saw for the turnbuckles (which
makes a lovely smooth hole). I was fortunate to have the use of a good pedestal
drill at the yacht club for this. For the port side and backstay plates I used
the old plates as a template to put the bolt holes in the right place. I made
the corresponding holes in the backing plates slightly oversize to ease fitting.
The 5/8" holes for the chainplates were positioned to allow at least
5/8" plus half the shroud diameter of metal above - this is the formula
given in "Rigs and Rigging". I didn't drill these holes until I had
the new turnbuckles, to ensure there was enough clearance (there was!).
For the
starboard plates I first ground down the knees around the old bolt holes to a beveled
edge in the laminate (there is marine ply inside), filled the holes with
high-strength epoxy glue and laminated back to the original profile with woven
rovings and epoxy. This took about two days, and the worst job was grinding the
glass with an angle grinder because it filled the whole boat with glass dust. I
then marked up approximately where the new holes would be (staggered from the
old ones), drilled the chainplates, aligned them using identical measurements to
the port side and redrilled the knees. This took another full day, and I had to
cut away one locker end to get the drill at the knees.
I then
polished all the new fittings using mop and polishing compound and fitted them.
With a little pursuasion they all went in OK and I sealed the deck holes using
epoxy filler firstly, then replaced the beauty plates with a good dollop of 3M
101.
You may have
noticed I haven't mentioned the bow fitting. This is the usual Cheoy Lee
combined anchor/forestay fitting, with a flat plate welded on top to take
forestay and sails. I don't entirely trust it, although it looks ok. Replacement
is on the agenda, but it was too much to add to this job. Instead, I made up two
triangular 6mm 304 plates with two 9/16" holes at the base to fit the
existing fitting, and a 5/8" hole at the apex to take the new forestay
turnbuckle.
With the new
chainplates in and the mast primed and undercoated, it was time to think about
the spreaders, the tips of which, as I mentioned earlier, were corroded almost
to nothing. I contacted Yachtspars in Auckland and they quoted me a price of
about US$300 for a new set of spreaders. However, as there was nothing wrong
with the rest of the assembly, and as I was a little concerned about a new set
fitting exactly, I decided to repair the old ones. I bought a block of 6061 T6
for about US $5 and got to work with hacksaw, angle grinder and hand files after
cutting off the old spreader tips. Three days work saw me with new tips
inserted, through bolted and epoxied into place. This was not a particularly
difficult job, just time-consuming and boring! At the same time I also replaced
the spreader hinge bolts by making new fittings from 3/8" 316 stainless bar
(just extra-long clevis pins).
I then
fortuitously got a week-long weather window and completed painting the mast and
spreaders, using white International Marinecoat Topcoat. I tried to do a proper
job, sanding down, thinning properly and using good brushes. I got a few gobby
bits where the mast was resting on the sawhorses, but overall I was very
pleased. It remains to be seen how enduring the single pack finish will be, but
I made a conscious decision not to do an expensive twin-pack spray job for
reasons of both economy and health.
I replaced the
tricolour and fitted a combined steaming/deck light instead of the old spreader
lights. New wires were run. We use Nippon Denso tinned multistrand speaker cable
for masts in Hong Kong. This is a fraction of the price of "proper"
marine wire, and I am not aware of anyone ever having problems with it.
I also fitted
a new VHF aerial and coax cable and a Lightning Master charge dissipater. The
wind instruments (original B+G Hornet) needed new anemometer cups, and I made a
new vane from a small piece of scrap aluminum.
The total cost
of the paint job, wire, lights, other bits and bobs and all-new 12mm halyards
was about US$1500.
The final job
was to fit the new wires and spreaders and restep the mast. A last-minute hiccup
emerged when I discovered the new Hasselfors T-Terminals were bigger than the
old ones! Discussion in the bar revealed that, indeed, these terminals were
increased in size in the late 70s/early 80s following initial failures. My old
ones were the original small sizes, and had lasted over 20 years. So, I had to
get busy with the small hand files again and slightly enlarged the
mast/stainless insert cutouts. This took half a day. I then restepped the mast
with the help of a professional rigger who also cut the wires to the exact
length and fitted the Staloks. The rig now looks great and stronger than before,
and I hope I will soon be sailing.
When I took
this job on I new that it would require careful planning and expert assistance.
I was very lucky to have help from a professional rigger who gave me endless
free and invaluable advice, and who encouraged me to tackle most of the job
myself.
Total cost was
about US$4,000, including cranage, mast storage and relatively small amounts of
actual work by my friend the rigger (basically stepping the mast and rigging the
Staloks).
If anyone
wants any more detailed information I’d be glad to provide it.
Happy sailing
Nigel Evans
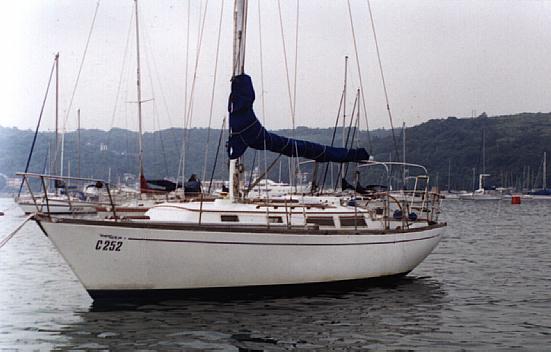
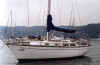 Boat-
"Jacqueline Boo" -1979 35 by Perry Boat-
"Jacqueline Boo" -1979 35 by Perry
OWNER - Nigel Evans
AREA OF SAILING - Hong Kong, China
E-Mail Nigel
|