|
Five
years ago, I removed the teak deck on my 1977 o/s 40 mk II
Ketch (Ray Richards),
"The Two Dolphins". This is the
"improved" version of the o/s 41'.
The problems with my teak deck, which are likely quite
familiar to most Cheoy Lee
owners were many. In the first place, the decks were
virtually programmed to failure. While the
best teak was used, unfortunately they were far too thin to
begin with, at only about 5/16" thick.
Therefore the plugs used for capping the fasteners were less
than 1/8" thick. After a few years of
scrubbing and walking around on the deck, they wore even
thinner, and began to lift out. Water
on deck then made it's way down the screws and into the deck
core.
The decks on The Two Dolphins are made of a sandwich of
1/4" glass on top and bottom
with «" solid teak lathes laid down in between. The
fact that the deck core is solid teak planks
vice plywood was a true Godsend, since it prevented any deck
core rot when the water entered
the deck core. However, that doesn't mean there weren't some
severe and serious problems
which resulted from the leakage of water into the deck core.
First, the liner on the bottom side of the decks, inside the
cabin was attached by stapling
naugahyde to small plywood strips held with small brass wood
screws. Once the water entered
the deck core, it chased down the seams between the teak
laths and followed the wood screws
down into the space under the liner.. This made the dead
space under the liner continuously damp
resulting in a lot of rot of the small plywood strips and a
lot of mold and mildew. The only cure
was to rip out the entire cabin overhead and side deck
overhead liners.
The next job was to tear up all the teak decking. First came
taking out as many of the
deck fasteners as possible. I did this all manually, since
when I tried to use a power tool, it kept
slipping off the screws because most of them were badly
corroded and frozen, making a mess
rather than removing the screw. All told, I got almost a
gallon of those screws by the time I
finished.
Then I removed the deck. I tried to save what I could of the
valuable teak and not just
rip it up. Otherwise, it may be simpler to just rip up the
teak and cut the screws off rather than
fight them out one at a time. During removal, it was clear
that about 90% of the screws had been
leaking, and were badly corroded.
There were a few places that required a bit of work, like
around the stanchions on the
taffrail deck, and a few other places where I had to use a
small wood chisel to trim the decking
where it went under the bow fitting and the mizzen sheet
track. Also, after removing the deck, I
cut the limber holes in the tow rail down flush with the
deck, so the decks would drain completely
dry. With the teak decks in place, there was always a small
puddle that couldn't drain because the
limber holes didn't extend down far enough.
Under the teak, was a layer of very thick and sticky black
mastic. I cleaned this up using
"Orange-sol". This is a truly amazing and
wonderful product that dissolves the mastic quite easily
and is reasonably easy to clean up. I used about two gallons
of it along with about ten rolls of
paper towels. There are a number of other similar orange
based products on the market now, and
most of them are about the same as "Orange-sol". I
understand the Orange-sol is the product the
fisherman used to clean up their holds after they got all
crapped; up during the Exxon-Valdez
spill cleanup.. It is non-toxic and environmentally friendly
and much nicer to use than any kind of
petroleum spirits or thinner, and left the fish holds clean
enough to again be safely used.
I took up the genoa tracks, and removed the spinnaker block
fitting on the foredeck, since
I never use them and the genoa track was a real toe breaker
anyway.
The next step was to drill out all the old screw holes to
1/4" and down to the bottom
sheathing. In some places the sheathing had come loose from
the core planks making the deck
flex. In these places, I drilled quite a few holes, like
pegboard. The most serious example was
almost the entire fore deck. Here, I drilled completely
through and through bolted the deck to
clamp it together. This was just temporary as I removed the
through bolts and filled the holes
after injecting West system in the entire deck core. I was
doing all this work hauled out at the
Port Annapolis marina, and there was an old '65 Chris Craft
Connie next to me the marina
manager wanted to get rid of. He hired a couple of fellows
to come out and completely cut the
boat up into little pieces. So while this was going on, I
was able to salvage several long extremely
hard and strong mahogany beams that amazingly had the same
curve as the underside of my
foredeck! So I cut them to the correct length to glass into
the underside of the foredeck. And
WOW did that ever make a big difference in the foredeck.
It's a solid as a big granite rock now.
After all the original screw holes were drilled out, I
allowed about three weeks for the
deck core to completely dry out and then injected West
system filler in all the holes. Along with
that job, I also used the West system fairing compound to
fair all the deck.
After sanding, sanding, sanding, sanding the deck. I painted
the decks with Duron
Duroclad white followed by a sprinkling of non-skid. I used
just fine sand, but there are other
nonskid materials available which are similar to
microballoons that some people seem to prefer..
The Duroclad is a paint used mainly on warehouse floors.
It's a tough paint that is reasonably
inexpensive and very durable. After the nonskid, I added two
more coats of the Duron and viola'
... done! The entire cost of the project, including
cost of cleaning stuff, west system stuff etc. was
less than $200, if you don't count the value of labor.
The resultant deck is so much cooler and lower maintenance,
I highly recommend this
modification. The teak decks would heat up in the sun so hot
it was impossible to walk on them
barefooted. And when the decks heated up, it heated up the
inside of the boat to unbearable
levels. Even throwing water on the decks hardly helped at
all. Now, being white, the decks are
much, MUCH cooler.
This is just a brief summary of the job. I'm glad to help if
anyone wishes more
information or help in tackling this task. I've never
regretted doing it, and have always been very
glad I did it. It may sound like an enormous job, but it
really isn't that difficult. Assuming dry
weather, it could be done in perhaps two weeks or less,
depending upon the size of the work
force.
Stephen Pastiva, Jr.
S/y "The Two Dolphins"
1000 Water Street SW #53
Washington, DC 20024
telephone: 202.554.1199
email: tygershk7@aol.com or
tygerhsk@bellatlantic.net
I
have read on one of your pages of someone recommending
the removal of the teak decks and replacing it with some
other material. I always thought that I could never do
this to a boat such as ours (CL32). Any other boat with
fewer of the traditional features - O.K. but not
something as romantic as the Clipper Ketch. I also had a
look at the "Kim Chow" website linked on your site. He
also replaced the deck with some non-skid material.
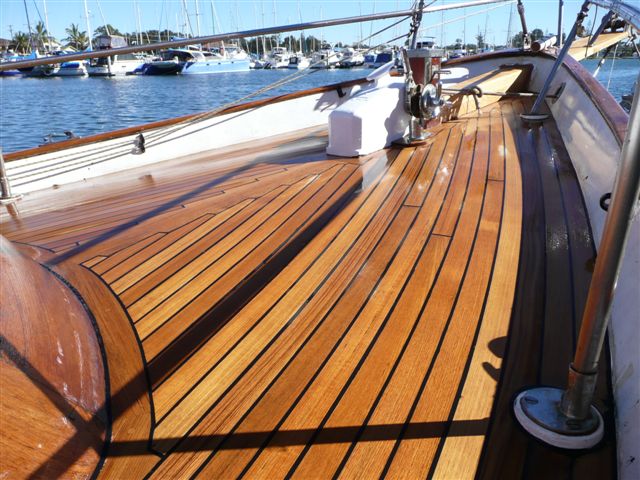
I
have attached a few photos of "Dragon Lady" after her
new decks were laid. Most of it is glued so there is
less chance of water getting into the substrate and the
new deck has added to its insulation properties. It
looks beautiful wet as it was when the shipwrights
photographed their work, and dry as well.
Maybe
you can find a place to post the photos to encourage
others to maintain their teak decks. Cost for the
re-decking excluding the cockpit was $10,000 Australian
and worth every cent for the longevity and the
aesthetics.
|