|
Surface Treatment of Ballast......
A. Epoxy Coating
B. Chemical Coating
Hull/Ballast
Joint
|
. |
There are two issues related to the cast iron ballast.
1. Treatment of ballast surface before applying bottom paint
2. Joint between ballast and hull
1. Surface Treatment
The Clipper Series (I am not sure what other models are the same)
have a cast iron ballast. I found, when grinding my ballast down to remove the
bottom paint, that the casting was of poor quality. There were several chunks of
square metal embedded in the sides of the ballast which showed that junk metal scraps were
thrown into the molds before pouring. This caused uneven cooling and several areas
of my ballast are very porous. This problem adds to the complex issue of how to coat
the iron to prevent rusting when the surface is not smooth.
There are at least two approaches to this problem.
A. Epoxy Coating (see sidebar below)
B. Chemically treating metal surface (click
here)
A. Epoxy Coating - The first approach is to coat
the surface with epoxy. Following is a letter we received from the West System
engineers outlining this approach...
James & Cilla,
Enclosed are instructions for applying epoxy to cast
iron. Once you have a layer of epoxy properly applied to the keel, apply a layer or
two of fiberglass to the epoxy surface coat. I have also enclosed information about
that process.
Metal Preparation.. Thoroughly sand the surface with coarse sandpaper to provide good
mechanical keying for bonding. Wet-out the surface of the hardware with epoxy. While
the hardware contact surface is still wet, abrade the coated surface with coarse
sandpaper, working the epoxy into the metal surface. This technique exposes fresh metal
directly to the epoxy without any air contact and the possibility of oxidation.
Applying Fiberglass Cloth, Wet method:
An alternative to the dry method is to apply the fabric to a surface coated with wet
epoxy. This is the more difficult method when applying large pieces of thin cloth.
However, this method is useful or necessary in some situations. When applying heavy
fabrics on porous surfaces, the wet method helps to assure the substrate is thoroughly wet
out. Cloth can be applied after the wet-out coat becomes sticky, helping it cling to
vertical or overhead surfaces. Pre-fit and trim the cloth to size. Roll the cloth
neatly so that it may be conveniently rolled back into position later. Roll a heavy
coat of epoxy on the surface. Unroll the glass cloth over the wet epoxy and position
it. Surface tension will hold most cloth in position. If you are applying the cloth
vertically or overhead, you may want to wait until the epoxy becomes sticky. Work out
wrinkles by lifting the edge of the cloth and smoothing from the center with your gloved
hand or a squeegee.
Apply a second coat of epoxy with a foam roller. Apply enough epoxy to thoroughly wet out
the cloth. Remove the excess epoxy with a squeegee, using long overlapping strokes.
The cloth should appear consistently transparent with a smooth cloth texture.
Any remaining irregularities or transitions between cloth and substrate can be faired by
using an epoxy/filler fairing compound if the surface is to be painted. Any additional
fairing done after the final coating should receive several additional coats over the
faired area.
You might want to request our free “WEST SYSTEM User Manual & Product
Guide”. A text-only version of that publication is available on our World Wide
Web site.
Sincerely,
Brian Knight
Technical Advisor
GOUGEON BROTHERS, INC.
100 Patterson Ave., P.O. Box 908
Bay City, MI 48707-0908
tel: 517-684-7286
fax: 517-684-1287
URL: www.westsystem.com |
|
B.
Chemically treating metal surface
This is a method that
one of our members Albert LaMarche aboard Providence has used and following are
e-mails sent in by him. I am inclined to use this method since it sounds like far
less man hours. I assume that the product that Albert used is similar to a product I
have used around the house that I purchased from Wal Mart. If was sold as a rust
converter, a friend said it converts rust to a co-polymer, but on my riding lawn mower
etc. it has worked great. It turns the rusty surface to a hard black coating.
I will keep you informed if I use this method and will take pictures as the process
proceeds. james...
James...
Ive spent a week removing the gelcoat from my
keel and am still not finished...a small 4 1/2 " grinder with a 38 grit sanding disk
works great...I read west system's comments with interest...particularly about sanding to
bare metal...good luck, the rust on my keel penetrated 1/8 to 1/4 inch, so I took
another approach...
prior to taking off all
the gelcoat I sprayed (bottle sprayer) two coats of phosphoric acid (West Marine sells it
under the name "rust-lock metal prep" ) (page 172 of current catalogue -
james) two days later I started removing the gelcoat any way I could; sanding,
grinder, pressure sprayer, and a few improvised tools like autobody pick hammers etc...I
then went back to the sanding disks on the grinder...what I found was that the rust had
turned to iron phosphate over almost all but a few small patches of rust of the
keel...using the pick hammer I was able to loosen most of the flaking iron..the iron
phosphate penetrated all the way to the base metal and left a very hard black surface that
can be finished...
the rest
of my plan is to grind away the rest of the remaining gelcoat particles and re-treat the keel with phosphoric acid several more times
for best penetration (to the keel bolts if possible)...this will be followed by coating
with a premium marine metal primer, sanding, followed by applying westsystem's gelcoat
with a filler to smooth over the rough surfaces... applying a good hydroscopic marine
paint to prevent water permeation through the gelcoat...then bottom paint....
Albert L...
Here is follow up letter from
Albert after one season in water...
James..... this is a follow up
to my original email regarding the preparation and restoration of the rusting keel on my
33 clipper...
This afternoon we pulled Providence after being in the water for seven months... there
were no, repeat no, rust spots or flaking metal anywhere on the keel... the product
POR-15 sealed the keel thoroughly and has held tenaciously to the prepped metal...
Hope that your restoration is going smoothly.......
Al LaMarche |
|
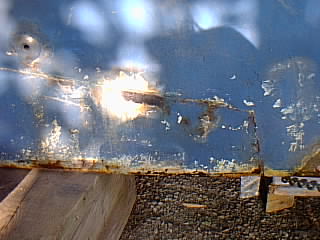
2. Joint between ballast and hull

Click to view
Here is shot of
stern portion of my ballast, note seam opening between ballast and hull |
The joint where the cast
iron ballast meets the hull is a problem. On my Clipper, when she was pulled from
the water, this seam was damp for several days. My concern was that water must have
a path to the keel bolts causing possible corrosion.
There has been two suggestions made by others. One is to glass over
this seam and the other is to use a material to fill the crack. Below is one e-mail
that suggest using sikaflex. I have not decided which method to use on our Clipper.
Does anyone else have any experience with sikaflex?? |
Here is excerpt from e-mail
message I received from Bob W.. onboard "Bolero" a 69 Clipper 36
Great to know there are many "69's still around. With care they should make
a 100 years!
Mine is a Clipper 36 built in '69. Have replaced or rebuilt everything at least
once. No experience with the keel problem. I've used Sikaflex where it joins
the boat, but nothing fancy. Bolts a worry, but never did the X-ray routine.
|
BACK |
|